Rebuild Discussions
Beginning in February, I had long conversations with Mikey about rebuilding my Deluxe Reverb Reissue. We exchanged lengthy emails with ideas about the rebuild and the conversations helped clarify my understanding of his concepts as well as his understanding of what I like to hear in an amp. These conversations have also helped educate me about component choices and what they will do to the sound.
As it turns out, Mikey and I have very similar tastes and both like the basic Deluxe Reverb sound. When you talk to Mikey, you’ll soon find out that tweaking an amp to an individual player’s style, their guitar choices and other equipment selections is the key to getting the best sound for the player.
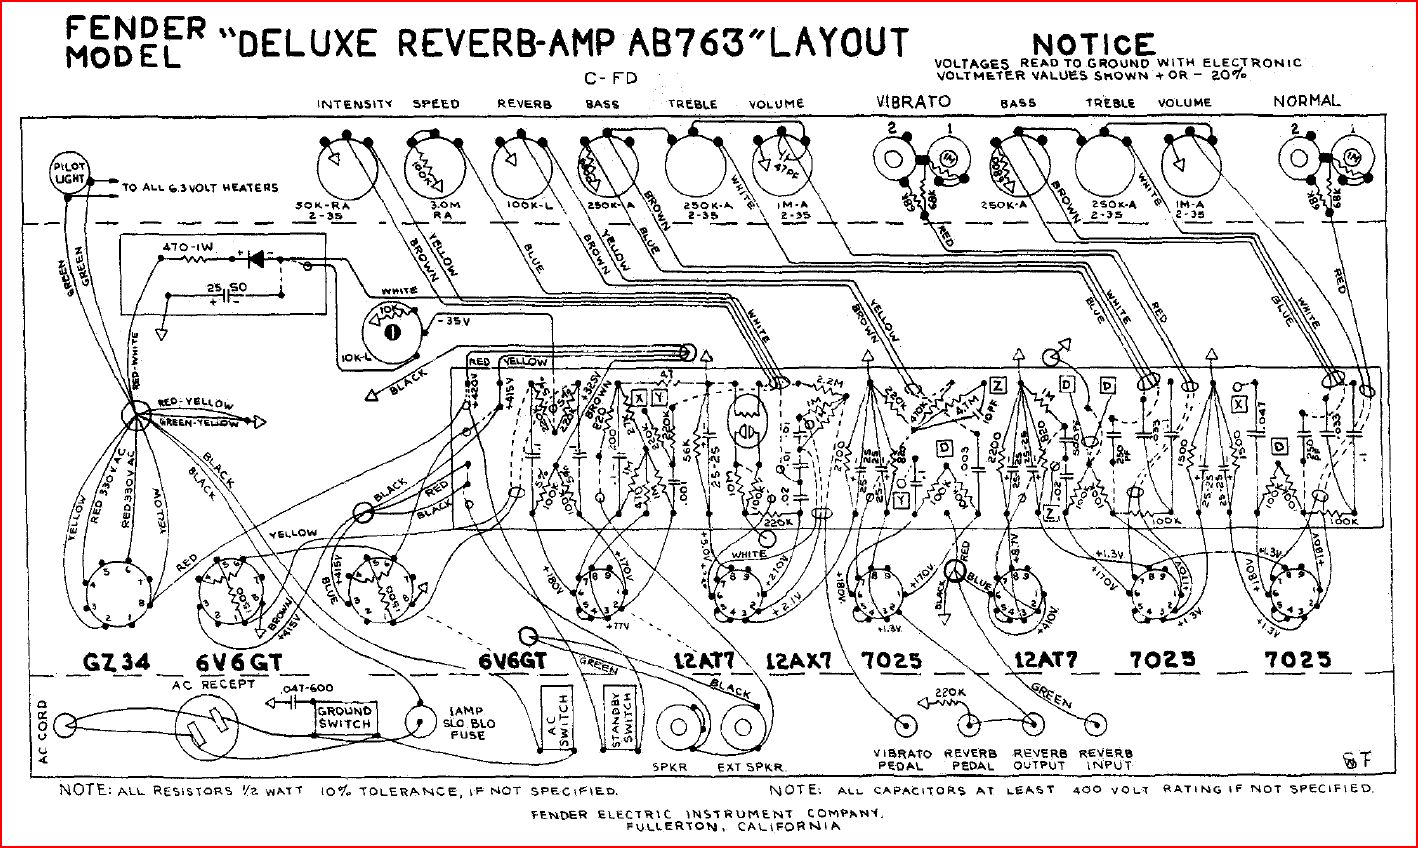
The circuit he uses as the starting point for his modifications is (not surprisingly) the one used in Deluxe Reverbs, which is called the AB763. It is used in a variety of Blackface Fender amps including the Deluxe Reverb, Super Reverb, Vibroverb, Virbrolux, Twin Reverb, etc. This means if you have a Blackface Fender reissue amp, chances are the AB763 circuit is used. Of course, there are variations to the circuit depending on the number and type of power tubes in a particular reissue amp.
Often, when I want to find detailed Fender amp information, I go to the Fender Amp Field Guide. There's a host of great information about all of the vintage Fender amps, plus, you can find copies of the chassis layouts and schematics.
Although Mikey has previously made a variety of different circuit boards, he decided to specialize in rebuilding the Fender reissues, specifically the Blackface and Tweed Bassman amps, and the reissue stand-alone reverb unit. Mikey says he may offer other circuits in the future and is considering additional performance upgrades for popular Fender amps not currently in the reissue line such as the Blues Jr., Pro Jr., Blues Deluxe, Blues DeVille, Hot Rod Deluxe, Hot Rod DeVille, etc.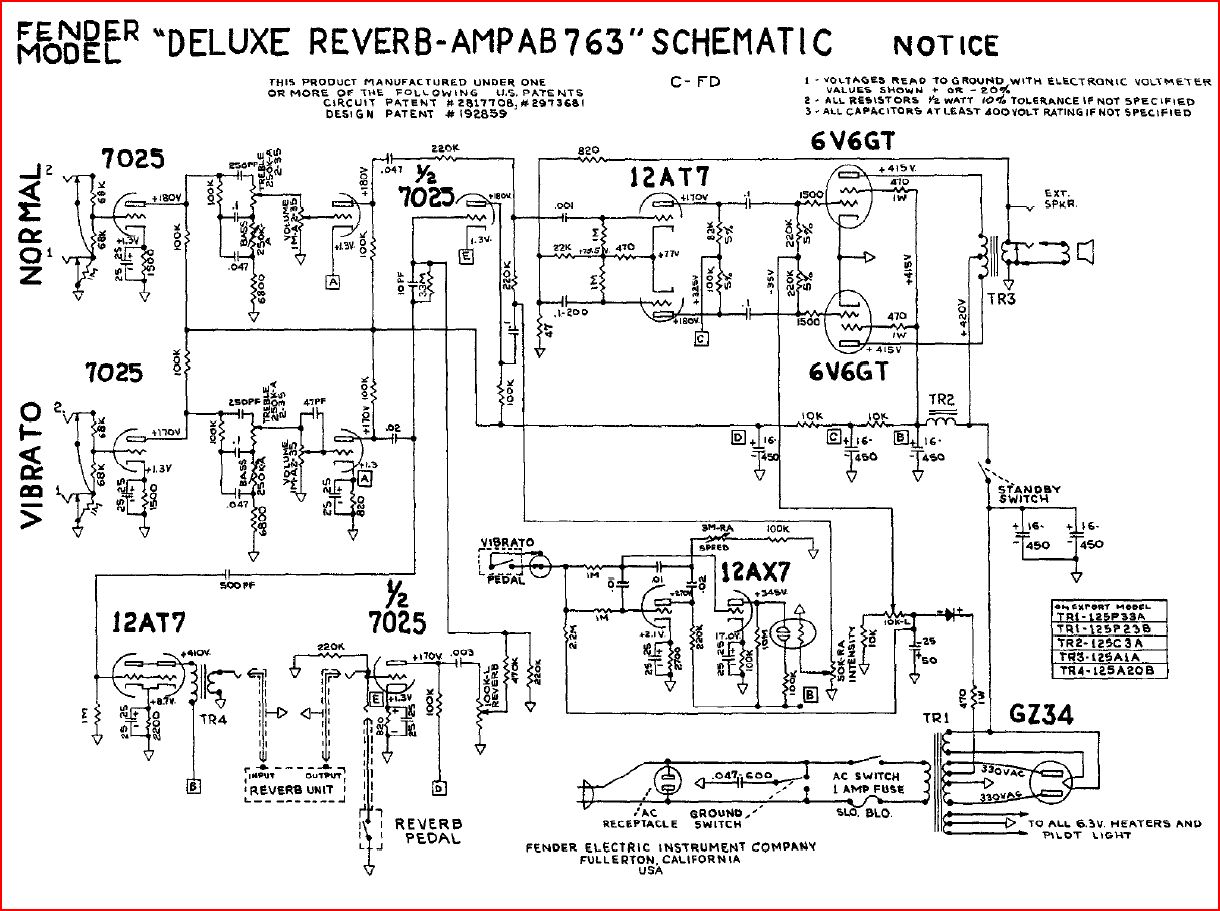
He got his start building amplifiers by using Hoffman Board Kits, which
are no longer manufactured by Doug. Mikey has been a long-time fan of
Doug Hoffman’s circuit designs and continues to get parts from the
Hoffman Amplifiers website. In fact, some Hoffman parts have found their
way into this project.
In
one of many emails I received from Mikey, he offered these comments
regarding the people that inspired and informed him during his quest to
build tube amps:
"I have to say, that I have a lot of respect for
Doug. I learned an incredible amount about amp building from his
website, which has a ton of information that he offers FREE of charge.
He absolutely has one of, if not the best, amp building forums around.
There aren't too many experts out there that offer their knowledge to
others free of charge. Doug Hoffman and Randall Aiken are two that come
to the top of my mind. I've learned a lot from both of them and I hope
to be able to "pass the torch" by offering the knowledge that I've
gained, and hope to gain, with others as well."
I can certainly
relate to Mikey's comments about Randall Aiken. I purchased one of the
first Aiken Invader amps in the early summer of 2001. It’s a wonderful amp. The Aiken Amplification website is
chock-full of technical information.
During discussions about rebuilding my amp, I had
the opportunity to consider and select some optional mods to Mikey’s
“stock” rebuild. For example, I chose the option for a Triode/Pentode
switch for lower volume situations.
I learned that Mikey likes to
modify the negative feedback loop from the standard AB763 circuit
because he has found a sweet spot for this amp to increase gain and
harmonics.
He suggested modifying the normal channel for more
midrange, overdrive and a more Marshallesque tone. On his personal amp,
he added a pot in place of the extension speaker jack to allow
full-range control of the midrange. While I still want to keep the
extension speaker jack, the plan is to test different midrange settings
on his amp with my guitars to find the optimum setting, which will be
set at a fixed value by placement of a properly-speced resistor in the
tone circuit of the Normal channel.
Internally, in addition to a
new circuit and filter cap boards, Mikey said I could select the option
to add bias points on the back of the chassis with adjustments made via
the bias pot accessed through the bottom of the chassis. Normally, the
bias pot is located on the main circuit board. The bias can still be
adjusted without the bias test points but the chassis has to be removed
to get the measurements, or you can use a bias probe (purchased
separately) in the power tube sockets. Although it costs more, I chose
the option with the external bias test points, which will allow me to
change output tubes without taking the amp to a tech.
There will
be 1K/5W screen resistors on the 6V6 tubes to prevent the kind of
failures I experienced on all three of my DRRIs.
Mikey suggested a
phase inverter (PI) mod to limit the farting out of the speaker at high
volumes. Lowering the PI’s cap value does this. Mikey has refined the
sound of his circuits by making subtle changes here and there rather
than a couple of major changes. For example, to balance the lower cap
value in the PI, which raises the low frequency limit but still keeps it
below what the speaker can reproduce, Mikey increases the PI coupling
cap to lower the frequencies going to the PI to compensate by allowing a
bit more midrange / fullness through.
He suggested a mod to run
the Normal channel through the tremolo and reverb circuits, putting both
channels in phase. This will let me use an A/B/Y pedal to run the
channels separately; with the Normal channel having a bit more gain and
midrange, and the Vibrato channel retaining the cleaner Deluxe Reverb
sound. With both channels in phase, I will also be able to run them
together for even more sonic goodness.
Mikey’s circuit uses the
pulsating bias tremolo circuit of the 63' Vibroverb and not the
optoisolator type that is used on most Blackface Fenders. This circuit
alters the bias of the power tubes instead of an on/off optoisolator.
He’s
also going to adjust the reverb circuit by using a 100K audio pot in
place of the 100K linear pot to give more fine control so the reverb
won’t jump too quickly from subtle to surf.
There are other
options to consider when getting a rebuild done by Mikey. He is a BIG
fan of Mercury Magnetics iron. These high-quality parts apparently have a
great effect on the tone of the amp and Mikey insists on using Mercury
Magnetics output transformers and chokes in his rebuilds. Mercury iron
can also be used for the reverb transformer and power transformer. I
initially chose the option to add the reverb transformer but as you’ll
see in a later section, I’m convinced the Mercury power transformer is a
worthwhile upgrade.
I certainly learned a lot in my email and
phone conversations with Mikey. I decided I wanted to document this
rebuild so in addition to saving all the emails, I asked him for digital
photos of each step of the building process. He agreed and what started
as my personal record keeping has ended up as this full-blown website
When
all is said and done, I’ll have boutique amp quality for quite a bit
less than the cost of a new boutique amp and this one will be personally
tweaked by Mikey to my sonic preferences. Plus, it'll be like a wolf in
sheep's clothing, housed inside.