Design
The stock DRRI uses printed circuit boards with smaller components and the pots and jacks are mounted to the green PCB. Mikey’s amp uses turret board construction and the pots and jacks are mounted to the chassis and hand wired. Look at the differences in the capacitors, resistors and wiring (instead of ribbon cables). A picture is worth a thousand words and this photo shows the dramatic differences between the two amplifiers.

Mikey and I went into the shop and started talking in detail about all of the planned changes to my amp. He took the time to patiently answer all of my questions as we went through each section. I really learned a lot during this session.
Starting with the main board, I learned that Mikey uses a 1/8” G10 board and turrets. Of course, I’ve seen turret board construction in other amps but I didn’t really understand how it is done. Mikey showed me how a large board is measured and cut to size. Then a circuit template (plastic) and a drilling jig (metal) is laid on the G10 board. The template indicates which holes need to be drilled and the jig is used to guide the drill bit as it cuts the board. Once all the holes are drilled, metal turrets are placed through the holes and a special tool is used on the drill press to flare the turrets in the board so they grip firmly. This is a time-consuming process but it makes for very solid construction.
Mikey talked about his existing circuit board template used on the amp shown in the above picture but he has since refined the circuit and construction techniques so he will be using a modified template for my amp. As we worked through the sections of the amp, he took the time to show me how the existing circuit in his personal rebuild would be modified for my build. Hey, I’m getting all the latest whiz-bang improvements!
One of the improvements is the use of 18-gauge buss wire, wrapped in a Teflon shield for the power rail and ground rail on the board. This will help insulate power supply noise from the signal wires that are in close proximity. Here’s what Mikey has to say about the use of Teflon shielding.
“Teflon is one of the best insulators available and by using Teflon as a shield on the power and ground rails adds additional protection for any hands that happen to be in the chassis! High voltage, bare wire, and hands don't mix too well!” Another reason he likes to use 600V Teflon wire is that it gives an extra measure of
insulation from other components.
Mikey will be using the optional Mercury Magnetics iron in my amp for the output and reverb transformers and the choke. (Note: A few days before picking up my amp, a decision was made to talk to Mercury about removing the DRRI power transformer and replacing it with a Mercury Magnetics power transformer. This makes for a good story, which you can read in a later section.)
Mercury Magnetics is highly regarded and they’ve taken the time to reverse engineer the best sounding transformers. Mikey explained they use interleaved windings, which the Fender transformers in my stock DRRI don’t have. If nothing else, Mikey strongly recommends using the Mercury output transformer because it adds so much more tone for a few more dollars.

The choke and the output transformers from Mercury Magnetics are significantly larger than the stock iron. I wasn't clear on the purpose of the choke so Mikey explained that it is an inductor, which means it opposes changes in current. As current decreases, it lets more through and vice versa. The inductor smoothes the current whereas a resistor doesn't offer any flexibility in how much current it lets through.
On the back of the DRRI, there is an unused switch that was used to change the polarity of the AC coming into the amp on the old Blackface Deluxe Reverbs. Since all modern amps use a grounded AC connection, this switch isn't needed. Fender put this switch in just to make the back of the amp look like an original.
On my amp, this SPST (single pole, single throw) switch is replaced with a DPDT (double pole, double throw) switch for the Triode/Pentode mod. This changes how the 6V6 tubes operate. If someone chooses a different mod like turning the negative feedback loop of and on, the SPST switch can be reused.
6V6s are pentode beam power tubes. These do the "heavy-lifting" power amplification in the amp. There are five main parts inside a pentode tube, which are the cathode, grid, screen grid, suppressor grid and plate. Take a look at this scan from the RCA Receiving Tube Manual.
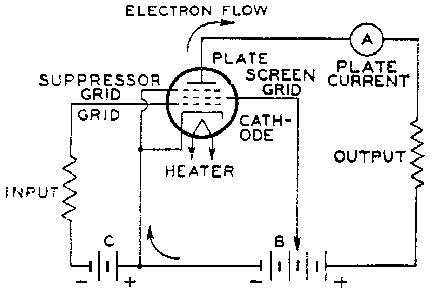
Pentode circuit showing the parts of the tube (inside the circle) and the signal path
The heater in the tube is powered by filament wiring coming from the power supply. These heat up the cathode, which starts shedding electrons causing DC current to flow through the tube. The very low signal from the guitar goes into the preamp section of the amp and the preamp tubes do the initial signal amplification and tone shaping. This signal comes out of the preamp section and is introduced into the power tubes at the grid.The Deluxe Reverb uses a method called "fixed bias" by making the grid negative with respect to the cathode when no signal is present on the grid. Depending on the amount of negative DC voltage on the grid, the tube will let more or less current pass on through. The bias pot on the bottom of the Deluxe Reverb chassis is what is used to make this adjustment.
Since the bias voltage is negative, more negative bias voltage to the grid restricts the electrons coming off the cathode, which restricts the current flowing to the plate. Less negative bias voltage to the grid allows more electrons to pass to the plate. With less current going to the plate, the amp is considered to be biased “cold” and with more current it is biased “hot”.
The screen grid helps keep the electron flow stable by reducing oscillations. The suppressor grid deflects secondary emissions back to the plate, which results in more power. The plate receives the electrons coming from the cathode. As current flows from the cathode to the plate, the varying preamp signal on the grid is amplified big-time and then it flows into the output transformer, which drives the speaker.
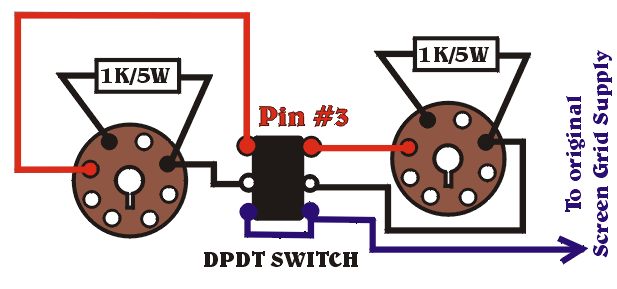
Mikey explained that when the Triode/Pentode switch is thrown to Triode, the screen grid is tied directly to the plates of the tubes, essentially eliminating the suppressor grid. This reduces the power of the amp and changes its tone and feel. The volume is lower, the tone is smoother and darker and the breakup happens sooner. It's a nice thing to have for lower volume situations, for bright guitars and probably for players who like jazz. The nice thing about this mod is that when the switch is set for Pentode, the response is exactly the same as a Blackface Deluxe Reverb.
Here's a diagram of the wiring for this Triode-Pentode switch.